
Introduction
This is the second post in a series I’m doing about installing Release Management and using it to deploy a web application using Powershell DSC (Desired State Configuration). However, we won’t be using the agentless model, but instead rely on the RM Deployment Agent to transfer the package and run the deployment script.
The first installment of this series covered Installing Release Management in a non-domain environment. In this post, we’re going to look at the different types of building blocks Release Management provides, and how to use them to deploy an application.
What’s in the box?
Release Management uses quite a few concepts, and I found that if you’re just getting to know RM, these terms can quickly blur into one another. So let’s take a short tour in what RM offers us.
Note that I’ll discuss only the role that each concept plays in the Agent/2013-based scenario, in vNext some of these concepts work slightly different or might not be available at all.
Tool: Represents a generic low-level program or script that can be used to perform part of a deployment, such as the XCopy Deployer, the DACPAC Database Deployer or the Windows Services Manager. A tool is executed locally by the Deployment Agent, and is characterized by the fact that it must be invokable from a commandline, possibly with parameters that can be specified by the caller of the tool and that are passed to it as its commandline arguments.
A tool can optionally have one or more resources, which are the files on which the tool depends when it is invoked. Usually, this is the script file or executable being invoked, including any dll’s or other files on which it depends.
Action: Represents a more specific operation that is performed as part of a deployment, such as Restore SQL Database or Start Windows Service. Usually, an Action depends on a Tool to perform its work, and just like a Tool, an Action can have parameters that can be specified by the caller to be passed on to the Tool. Unlike a Tool however, Actions do not have any files or resources – they can only control how the underlying Tool is invoked.
Component: A part of the application to be deployed, such as a database, a web application or a windows service. A component consists of one or more files that are retrieved from either TFS as part of a build result, or from a local folder or network share.
Like an Action, a Component relies on a Tool to have its files deployed correctly, and like Actions they can have parameters.
Stage: Basically this is a phase in the release process such as Test, Acceptance or Production, through which a Release transitions. The possible stages are defined as a simple list of names (a so-called picklist) without any properties.
Server: A machine on which (part of) the deployment occurs. In order to be used in an Agent-based scenario, a Server must have the RM Deployment Agent installed onto it, so that it can poll the RM server for work.
A Server usually belongs to just one Environment, although it is possible for it to belong to 0 or multiple Environments.
Environment: An Environment forms a collection of related Servers to which the application as a whole can be deployed. You’ll often see that the available Environments mirror the defined Stages, i.e. that there exists a Test, an Acceptance and a Production environment.
Release Path: Defines the process to be used, that is, the order in which the application should be deployed to the different Environments, and who (if anyone) should give their approval before the next step in the Release path may be executed.
Typically a release path is centered around a single application, but if multiple applications share the same group of people that need to give their approval, a Release path can also be centered around this group – i.e. you could have a “Human Resources – DTAP path” for all releases that need to be approved by HR.
Release template: A release template combines all the previous concepts (either directly or indirectly) to form a blueprint of how a specific application should be released.
A release template must be based on a Release path and inherits the Stages that it defines. For each Stage, a Windows Workflow-like “deployment sequence” defines which Components are to be deployed on each Server, and which additional Actions should be performed. If the Components or Actions have any parameters, these can be specified here as well.
The following mockup shows how all these concepts are related:
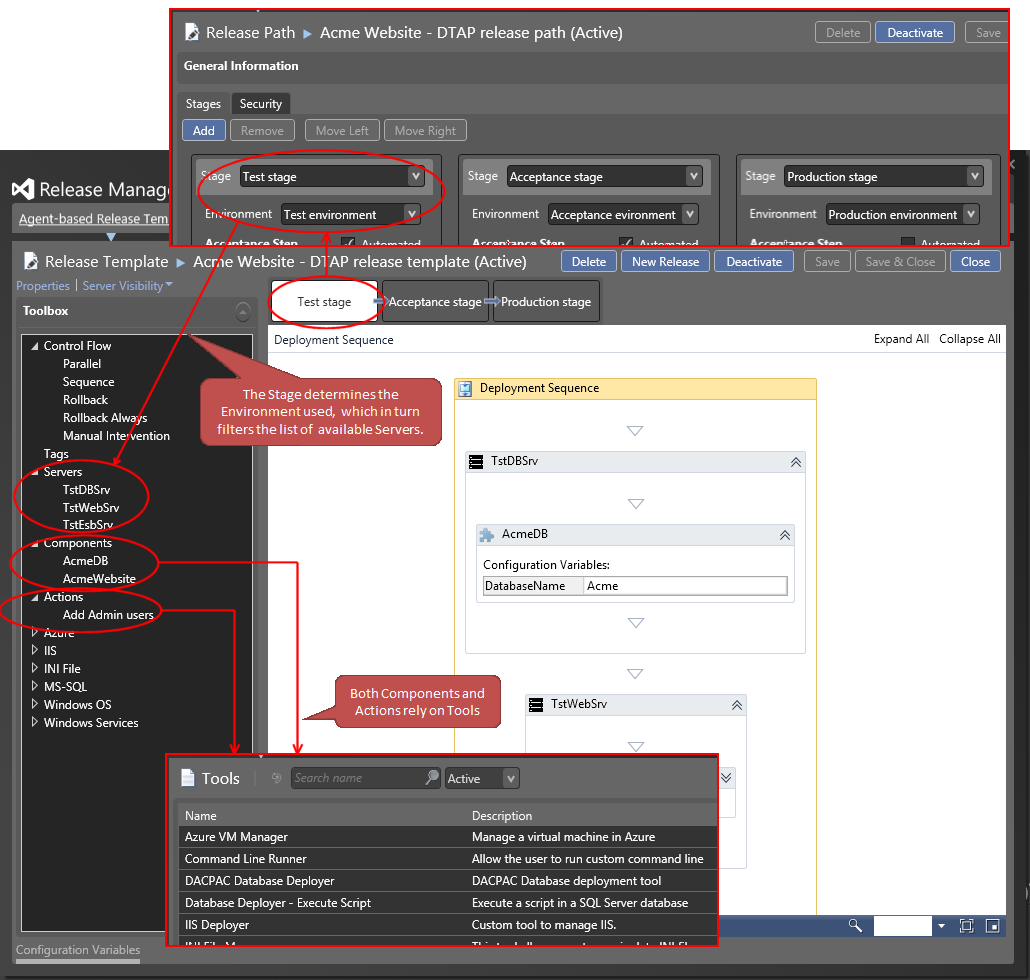 Each stage in a Release template has its own deployment sequence, so in theory a deployment on a test Environment could differ from deployment on the production Environment. In practice you’ll probably want to keep the difference in the deployment sequences down to a minimum and only vary in the parameters specified for the Components and Actions.
Luckily, a deployment sequence can be copy/pasted by right clicking on a Stage in the Release template designer; RM will even ask you which servers it should use for the target Stage.
Release: Once you have saved the Release template, you can use it to create a Release with; A release is basically a running instance of the Release template – Using it you can track progress of in which Environment the application has been installed and who has approved (or rejected) the release.
Defining a release
Let’s put this knowledge into practice by defining a Release template for a simple ASP.NET web application we’ll call the HelloWorldApp. I won’t provide any sources or deliverables for it, since basically any simple web application will do – or indeed, any .html file.
Creating the Test and Production environments
If you’ve followed along with my previous blog post, you should already have a Release Management installation configured with a TargetServer to deploy to.
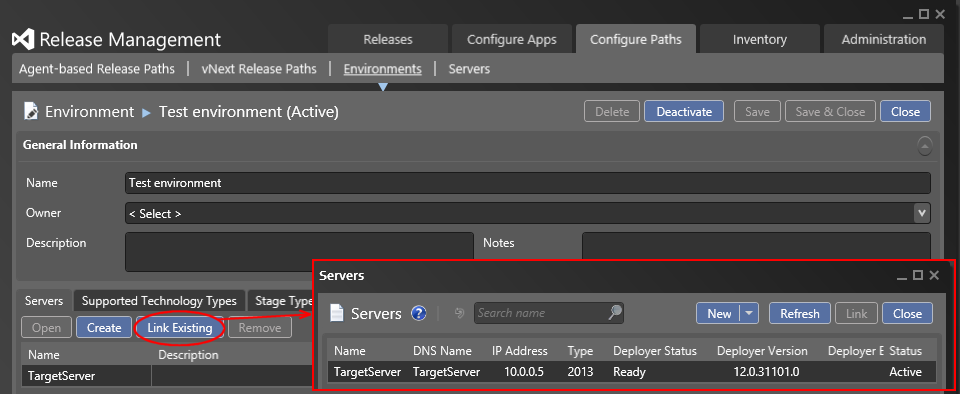
Now, we’re going to define a Test and a Production environment to deploy our HelloWorldApp in. In our limited setup the TargetServer is the only server we can perform the deployments on, so we’ll have to make it double as both a test and a production server – obviously this is not something you want in a ‘real’ setup.
Under “Configure Paths”, “Environments”, use the button “New: Agent-based” to create a new Environment named “Test environment”, and link it to the existing TargetServer. Next, create another Environment named “Production environment” and link it to the TargetServer as well.
 Defining the Release Path
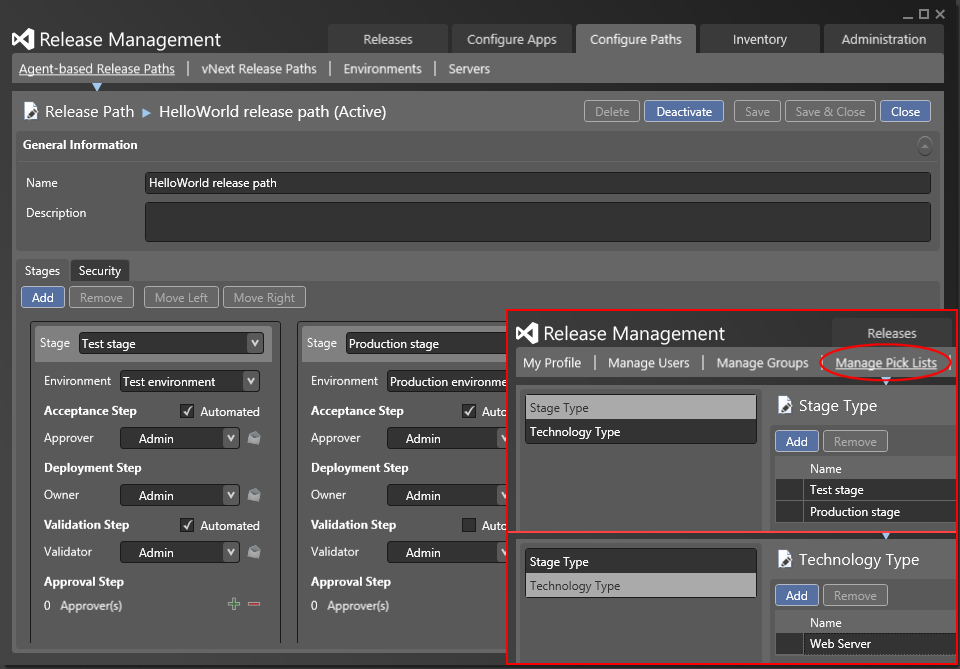
In order to have the Test and Production stages available in our Release path, navigate to “Administration”, “Manage Pick Lists” and add them to the “Stage Type” picklist (see inset in the screenshot below).
After this, under “Configure Paths”, “Agent-based Release paths”, create a new Release Path with these two stages, where in each stage deployment occurs to the corresponding Environment. Note that every Step must have a user associated with it for traceability purposes.
Also, you might want to mark the Acceptance and/or Validation steps as Automated, so that you don’t explicitly have to give your approval on each step before the release continues.
 Creating a Powershell deployment script
Eventually, we want the Components of our HelloWorldApp to be deployed using Powershell DSC, so we’re going to create a custom Tool for it based on a Powershell script. For this post I won’t be using DSC just yet (I’ll leave that for next time), but instead use a simple Powershell as a stand-in that just copies the files to illustrate the purpose.
Create and save the following Powershell script as “DeployMyWebsite.ps1”:
param(
    [String]$DestinationPath
)

try
{
    Write-Output "DeployMyWebsite.ps1 started. Copying files from ""$pwd"" to ""$DestinationPath""..."

    # -Force overwrites any existing files, -ErrorAction Stop makes sure we end
    # up in the catch handler if the operation fails.
    Get-Item * -Exclude @("DeployMyWebsite.ps1") | Copy-Item -Destination $DestinationPath -Recurse -Force -ErrorAction Stop

    Write-Output "DeployMyWebsite.ps1 completed."
}
catch
{
    # Use stdout rather than stderr to log the error to. Even though RM
    # captures both streams, using stderr results in the messages being logged
    # out-of-order
    Write-Output $_.Exception

    # Important: use the exit code to tell RM that the operation failed, RM
    # doesn't see any uncaught Exceptions.
    exit -1
}
Adding a Tool that deploys our application
Next, under “Inventory”, “Tools”, create a new Tool called “Deploy my website”, and add the DeployMyWebsite.ps1 script to it that we just created. This ensures that our script will be copied to the staging folder on the target server when our Tool is used.
Note that if the tool is used to deploy a Component with, this is the exact same staging folder as where the Component’s files end up. This is why we explicitly excluded the file “DeployMyWebsite.ps1” from the copy action in our script: we don’t want it to be copied to the web directory with all other website files.
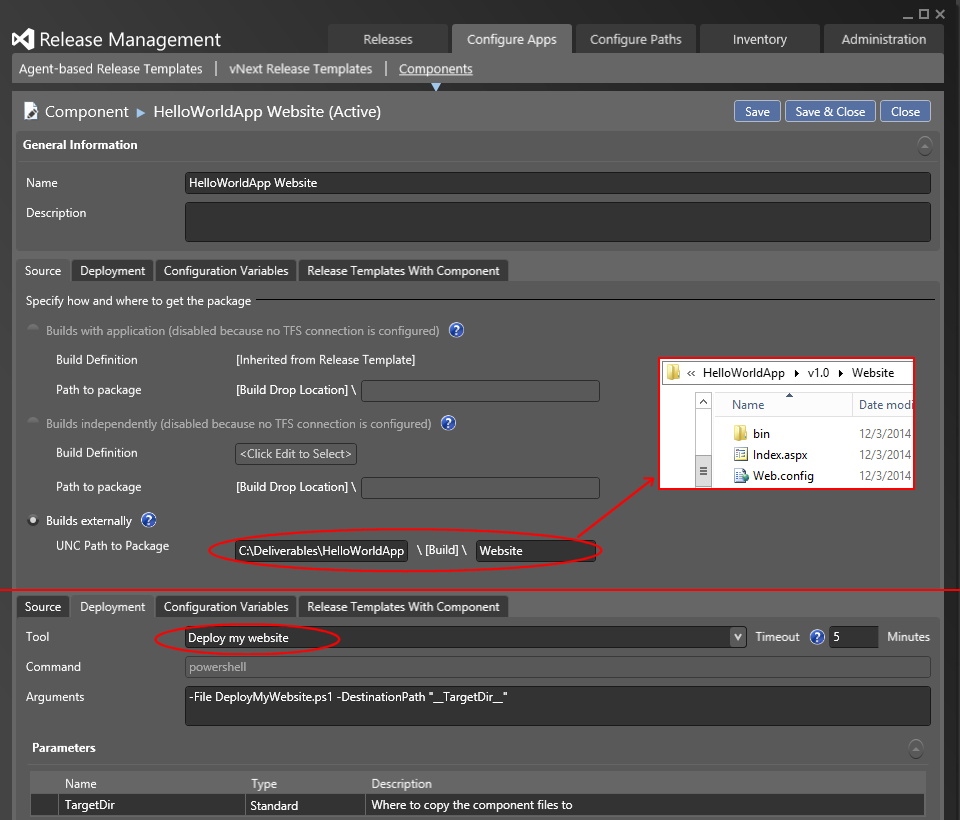
As displayed in the screenshot, specify powershell as the command and -File DeployMyWebsite.ps1 -DestinationPath "__TargetDir__" as the arguments. This has the effect of using powershell to execute our script file, passing a target dir as the DestinationPath argument.
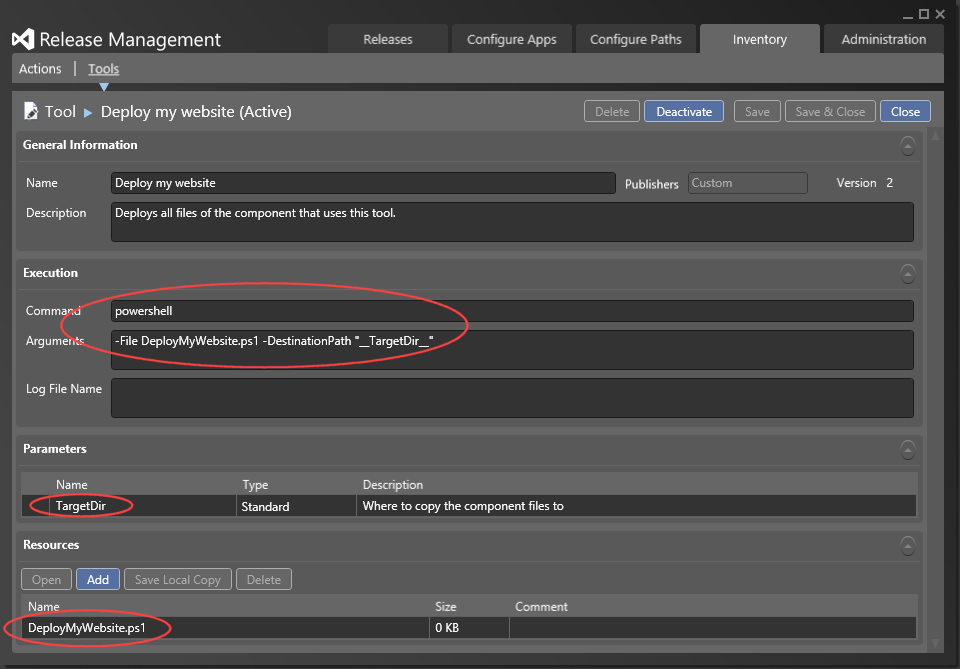 You’ll notice that by using the text
 __TargetDir__ in the argument list, RM will automatically add a “TargetDir” entry to the Tool’s parameters – this is RM’s way of specifying parameter placeholders. Also note that we’ve enclosed that placeholder in double quotes, so that the arguments get interpreted correctly even if the configured TargetDir value has spaces in it.
Creating the HelloWorldApp Website component
As discussed earlier, Components represent the individual parts of an application. In case of the HelloWorld app, we only have one Component: the website. To create it in RM, go to “Configure Apps”, “Components”, choose “New Agent-based” and name it “HelloWorldApp Website”.
Because we didn’t configure a TFS connection, we’ll have to specify an UNC Path to the package. As you can see from how the path should be entered, it makes sense to structure your deployment files on disk as <product><build or version><component> (see inset). The “[build]” part cannot be specified here, this is done when you actually schedule a Release.
On the Deployment tab, select the “Deploy my website” as the Tool to use for deploying this Component; this will cause RM to copy the Tool’s command and argument values. Note that you cannot change the command here anymore, although you could change the arguments to tailor them to the Component you’re deploying. For the arguments you don’t want to hard-code, you can use the same double underscore placeholder notation to define parameters with. For our purposes, we’ll just use the command and argument values from the Tool.
 Defining a Release template
Now that we’ve defined the Component that makes up our HelloWorld application, and a Release Path to follow when deploying it, we can tie these together in a Release Template. To do this, navigate to “Configure Apps”, “Agent-based Release Templates”, and create a new template named “HelloWorld” that is based on the “HelloWorld release path”. We won’t go into the security options here, the default options will do for now.
Once in the Release Template design surface, drag the TargetServer into the Deployment Sequence box – all Components and Actions that end up here will be executed on the TargetServer when we’re performing a Release.
Initially, our HelloWorldApp Website won’t show up under Components (which I found kind of confusing) – you’ll have to right-click on Components and choose Add to make it accessible. Once you have, drag the HelloWorldApp Website into the TargetServer, and double-click it there to open its configuration.
Here, you’ll need to specify the TargetDir that we defined as the Component’s argument. You’re free to choose any destination you like, but with our current DeployMyWebsite.ps1 script there are 2 caveats:
- The configured target dir must already exist on the TargetServer, otherwise the files will still be copied (the target dir is then created automatically), but the deployment folder structure will be gone – all the component files will end up in the same folder.
- Make sure that, for the TargetDir value, you don’t specify a backslash as the last character. Remember that we enclosed the “
__TargetDir__” in double quotes, and if the TargetDir ends in a backslash, this means the final command contains ‘"‘.cmd.exesees this as an escape sequence, which causes the command to be misinterpreted.
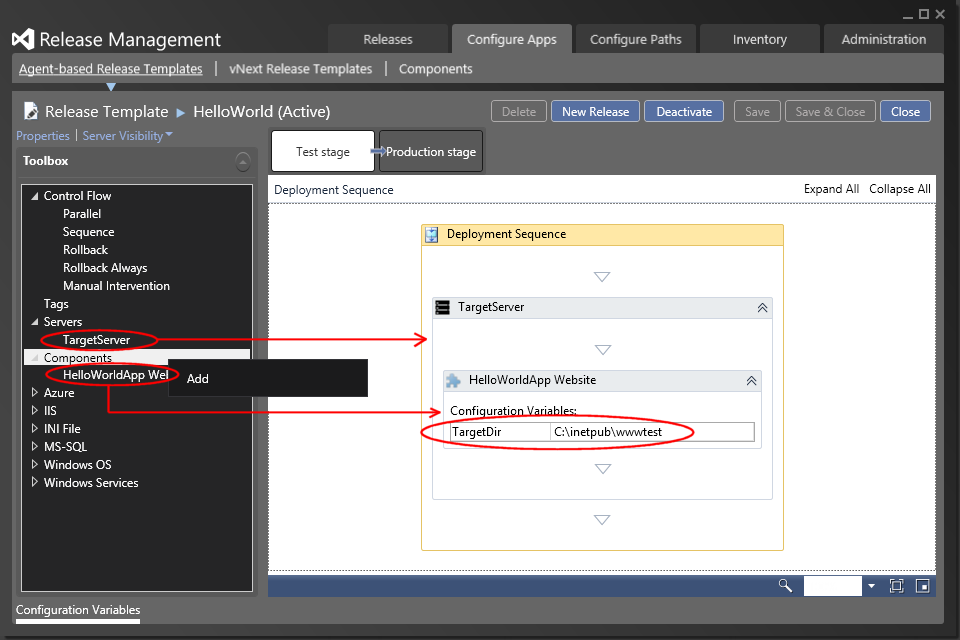 For now we’ll leave the Production stage empty, although you could easily copy the Test stage sequence by right-clicking on the stage buttons and using the Copy/Paste context menu actions.
Performing a Release – Finally!
There is more than one way to start a new Release, but the one I find the most intuitive is to go the Release Templates overview, select the appropriate template and click on New Release. In the dialog that follows you can choose if you want the Release to follow the entire Release Path, or just up to a specific target stage.
Also, you’ll have to specify which version (or “build”) of the application to deploy, this value will become part of the Package Location from which the Components will be retrieved – you will see the resulting Package Location path change as you type.
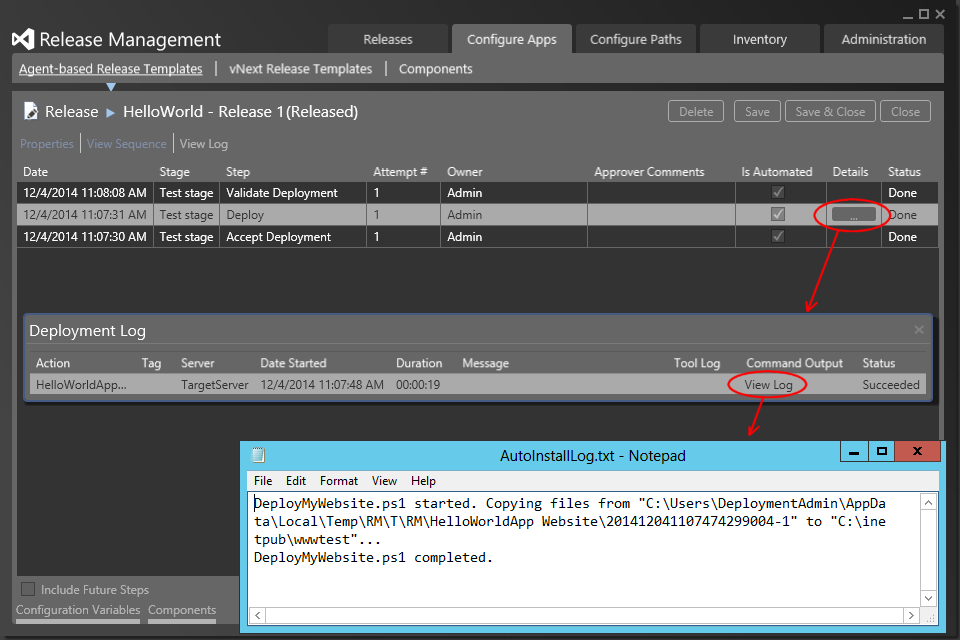
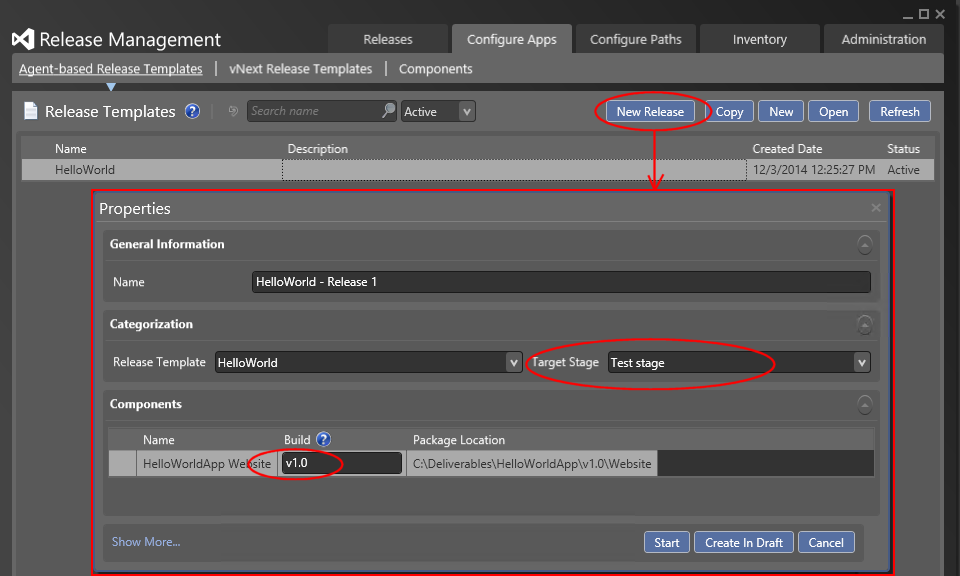 When you press Start to begin the release, you will see the steps through which the release progresses, and if all goes well, after 20 seconds or so it should show that RM has successfully deployed the HelloWorldApp website.
(If the release appears to hang on the Deploy step, you might have to set the Deployment Agent service to Delayed Start – see my previous post).
 Summary
So far, we’ve installed Release Management and used it in combination with a plain vanilla powershell script to deploy a website with. In the next installment, we’re going to replace this with a Powershell DSC (Desired State Configuration) script.

 8 comments
 .NET
.NET
8 comments
Hi, in your previous post you configured the agent to run under a local account on targetserver…how is the local account on targetserver able to access the unc location where your build output is stored?
Simon
Hi Simon, when adding the target server, I’ve configured the Drop Location Access to be “Through Release Management Server over HTTP(S)”, so that the release packages that this server gets sent are transferred over the RM Server’s webservice. This way, the TargetServer doesn’t need access to an UNC share.
Léon Bouquiet
Hello. Thank you for taking the time to read this. This was a very helpful post. Would you have any ideas as to why the deferred deployments don’t start at their scheduled time. We have already checked the time settings on all servers/clients on the domain.
Gerald Gunter
Does non-deferred deploying work? If so maybe daylight saving is getting in the way. Otherwise, you might want to check out my other post about Release Management troubleshooting tricks (https://blogs.infosupport.com/release-management-3-troubleshooting-tricks/), this could shed some light as to what goes wrong.
Léon Bouquiet
I want to understand how to test whether a web application is accessible after deployment through release management. A powershell script is sufficient? if yes, how to get return value from the powershell script
Aswin S
What you’re referring to is called a “smoke test”, and you could definitely do that from Powershell, although I would probably not include it in the deployment script. Rather, use a separate Action with its own Powershell script. If the smoke test fails, the “smoke test” Powershell script should return with an error code – this way, you can tell the difference between a failed installation and a failed smoke test.
Léon Bouquiet
[…] https://blogs.infosupport.com/deploying-an-application-using-ms-release-management/ […]
RM: deployment naar on-prem target | Vincent
How do we make sure the environment specific app.config changes are updated during the deployment?
Panidil