In my previous blogpost I wrote about how to load data from a less-structured data source into Excel, in order to further integrate and analyze the data with tools like PowerPivot and Excel’s Quick Analysis. The example was about displaying all gas stations in the Netherlands inside GeoFlow.
In order to use the less-structured data we captured from a website in GeoFlow, we need to write some stuff in the Data Explorer Language. In this blogpost, I will provide an introduction to the Data Explorer Language.
Before we start
Before we can start actually editing formulas and doing advanced stuff, the ‘Advanced query editing’ option needs to be turned on. You can find this option under the Data Explorer ribbon tab, in the section ‘Machine Settings’, button ‘Options’.
Introduction to Data Explorer Expressions
Before we split up the available information, let’s clean up the data set a bit.
When we return to the Excel sheet we left off in the last blogpost, we’ve left a large table as displayed above. By selecting the table in Excel, we’re able to edit the query – in Excel terms, to ‘Filter & Shape’ it. This can be done in two ways:
- When selecting the table, the ‘Query settings’ pane pops up at the right side of the Excel window. Inside is a button ‘Filter & Shape’
- When the pane doesn’t show up, we can select the ‘Table Tools – Query’ tab on the ribbon. Inside that ribbon tab, inside the group ‘Data’, is a button ‘Filter & Shape’ (also, when you’re missing the ‘Query settings’ pane, you can turn it on here).
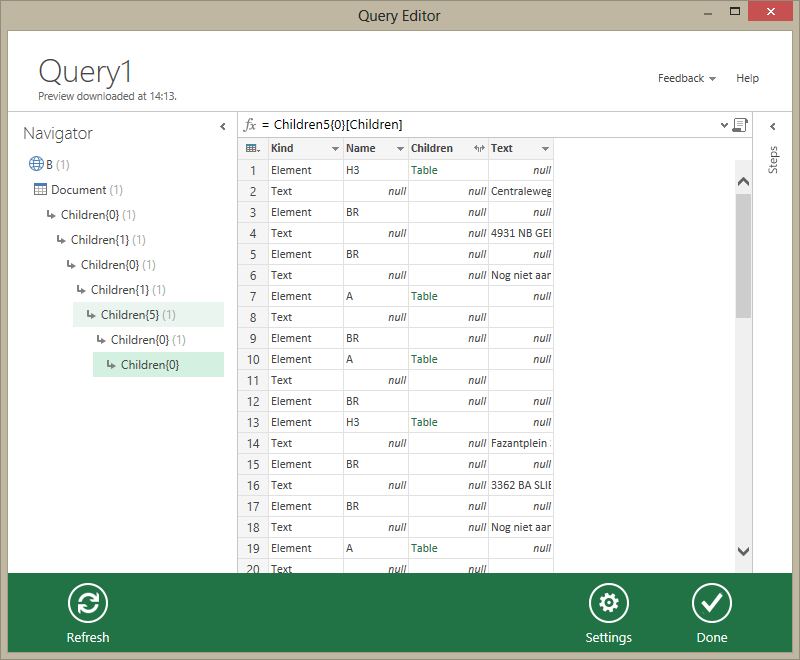
When clicking one of the ‘Filter & Shape’ buttons, the Query Editor window pops up.
Behind the scenes, Excel has generated a formula for us. When we want to do more ‘advanced’ things like filtering the results and putting results in different columns, we need to edit the query.
To edit the query, the Formula bar needs to be displayed. In the screenshot above, the formula bar is the row containing the text ‘fx = Children5{0}[Children]’. If it’s not displayed, you can show the formula bar using the ‘Settings’ button. Because advanced query editing is turned on, there’s also a symbol of a scroll to the right of the Formula bar. Clicking the scroll pops up a new window containing the formula that is used to load the data. At this moment, the formula looks like this:
let
    Source = Web.Page(Web.Contents("http://www.brandstof-zoeker.nl/station/B")),
    Data0 = Source{0}[Data],
    Children = Data0{0}[Children],
    Children1 = Children{1}[Children],
    Children2 = Children1{0}[Children],
    Children3 = Children2{1}[Children],
    Children4 = Children3{5}[Children],
    Children5 = Children4{0}[Children],
    Children6 = Children5{0}[Children]
in
    Children6
This ‘formula’ really is structured via a functional programming language (a pure, partially lazy, higher-order, dynamically typed, functional programming language, if you like ;-)). It is constructed in two parts:
- definitions / aliases / variables (the ‘let‘ part)
- returned value (the ‘in‘ part)
The ‘let’ part is mainly used for readability – everything we write there, can also be included inside the ‘in’ part. The things we write inside the ‘let‘ parts are variables. If you have a programming background, remember that this isn’t your ordinary variable – variables in Data Explorer Language are immutable, just like mathematical variables. Whether you have a programming background or not, you can think about a variable as an alias: the variable ‘Children6’ is defined by the expression ‘Children5{0}[Children]’. In turn, the variable ‘Children5’ is defined by the expression ‘Children4{0}[Children]’. That means we can replace ‘Children5’ by the definition of ‘Children5’ (the strikethrough part is removed, the bold part is added):
let
    Source = Web.Page(Web.Contents("http://www.brandstof-zoeker.nl/station/B")),
    Data0 = Source{0}[Data],
    Children = Data0{0}[Children],
    Children1 = Children{1}[Children],
    Children2 = Children1{0}[Children],
    Children3 = Children2{1}[Children],
    Children4 = Children3{5}[Children],
    Children5 = Children4{0}[Children],
    Children6 = Children5Children4{0}[Children]{0}[Children] in Children6
When we replace the ‘Children4’ alias in the same way, we get:
let
    Source = Web.Page(Web.Contents("http://www.brandstof-zoeker.nl/station/B")),
    Data0 = Source{0}[Data],
    Children = Data0{0}[Children],
    Children1 = Children{1}[Children],
    Children2 = Children1{0}[Children],
    Children3 = Children2{1}[Children],
    Children4 = Children3{5}[Children],
    Children6 = Children4Children3{5}[Children]{0}[Children]{0}[Children] in Children6
Continuing, we can get down to:
let
    Children6 = Web.Page(Web.Contents("http://www.brandstof-zoeker.nl/station/B")){0}[Data]{0}[Children]{1}[Children]{0}[Children]{1}[Children]{5}[Children]{0}[Children]{0}[Children]
in
    Children6
The in part is defines an expression which will be returned towards Excel. We can insert any variable here. Expressions are also valid in here – in such a way that we can even remove the last variable, though I think you’ll agree with me that this doesn’t help readability:
let
in
    Web.Page(Web.Contents("http://www.brandstof-zoeker.nl/station/B")){0}[Data]{0}[Children]{1}[Children]{0}[Children]{1}[Children]{5}[Children]{0}[Children]{0}[Children]
Looking the other way around: the in part determines what will be returned, the let part simplifies the in expressions by ‘capturing’ sub-results in variables, or by providing aliases for expressions.
When we use variables for our custom expressions, Excel helps us with inspecting the intermediate results of the variables. So let’s put the original text back in, and make a small modification. The modification is that we don’t display the entire table, but only the first row. We do this by the function ‘Table.First’. As you can see, we store the result inside FirstElement, and choose to display the contents of FirstElement:
let
    Source = Web.Page(Web.Contents("http://www.brandstof-zoeker.nl/station/B")),
    Data0 = Source{0}[Data],
    Children = Data0{0}[Children],
    Children1 = Children{1}[Children],
    Children2 = Children1{0}[Children],
    Children3 = Children2{1}[Children],
    Children4 = Children3{5}[Children],
    Children5 = Children4{0}[Children],
    Children6 = Children5{0}[Children],
    FirstElement = Table.First(Children6)
in
    FirstElement
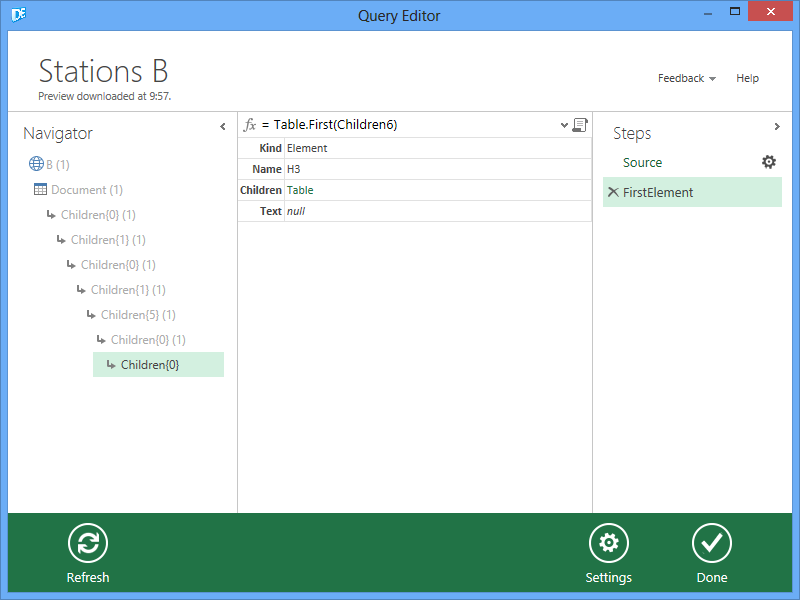
Now when we close the ‘Edit Query’ window by clicking ‘Done’, we return to the ‘Query editor’ window and see the results of our operation:
To the left of the ‘Query editor’ window resides the ‘Steps’ pane. Expanding it brings up a list of steps that Data Explorer recognizes, as visible in the screenshot above.
Clicking ‘Source’ inside the ‘Steps’ pane brings up the results as far as Excel has generated them, clicking ‘FirstElement’ brings up our modified results. This makes it easy for us to inspect the results of our operations while crafting the formula to parse this document.
Data types and syntax
Because we’re importing data into Excel, it would be useful to return data in a table structure. The operations we can do inside a table (add a column, add a row), are quite different than operations we can do to data inside a table (add up two values, replace the instances of one text with another). It would therefor be useful to be able to work not only with tables, but also with other values. For that end, Data Explorer distinguishes several data types:
- Table
- Record (a row of a table, including column names)
- List
- Date / Time
- Time
- DateTime
- DateTimeZone
- Duration
With regarding to the syntax: With the {curly braces} a row number is designated inside a table, so ‘Children0{1}’ means ‘the first row of the table contained in variable Children0’. The [square brackets] designate the column name. ‘Children{1}[Children]’ returns the contents of the column ‘Children’ at row 0.
Conclusion
This blogpost provided a quick introduction into the Excel Data Explorer language. With this background, we’ll be able to build custom constructs to import less-structured data. In the next blogpost, we’ll put this knowledge to use by cleaning up the data we acquired.
To finish, a summary of the introduction to Data Explorer language:
- The query is composed using a formula
- The formula consists of a ‘let’ and an ‘in’ part
- Formulas can be hidden inside a ‘variable’.
- This is done in the ‘let’ part of the formula
- Everything that can be put into a variable can also be used directly…
- … but it’s not as readable as using variables 🙂
- Most data is initially formatted in a table
- A row number n can be accessed by using curly braces:
- For example: Children0{n} (where n is a row number, starting at 0)
- A column can be accessed by using brackets:
- For example: Children0[column name] (where column name is, well… the column name)
- A row number n can be accessed by using curly braces:

 0 comments
 Business Intelligence
