
 0 comments
 Various
*Moved to: http://fluentbytes.com/testing-your-web-application-with-selenium-and-mtm-part-2/
In this part I will show you how we can use MTM to drive the tests and use the data specified in MTM test cases to drive the tests. I build here based on the foundation we created in the previous post (part 1)
Test case in MTM
So in MTM you can specify your test cases and use the tool to execute your test cases and have data diagnostic data adapters run in the background to capture relevant data that can be attached to a bug filled from MTM when you execute a test and find a bug. The goal of this is that a tester is assisted to file good actionable bug reports so we can reduce the Tester-developer ping pong of bugs and the number of bugs closed as no-repro. A test might look as show at the picture below.
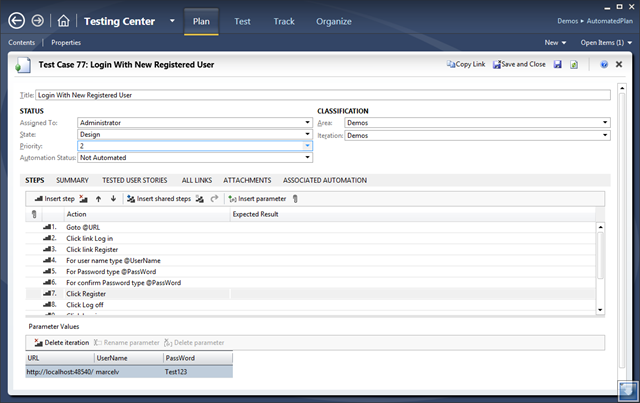
In MTM when we specify a test case, we note the steps that we want to take and mark verification points in the test case. The description of these steps are the logical test script and you also have the ability to use variables in the names of those test scripts. e.g. if we want to enter a name in a name field in the website, we can state: Enter @name in the name field of the form. Here @name becomes a variable that we can enter in a grid below the values that you want to use during the test run. adding multiple rows automatically results in multiple iterations of the same test case that we execute. In the example you can see I entered the variables @URL, @UserName and @PassWord
I also entered a list of values for those, so we can do multiple iterations of the test case and see if we hit bugs with specific values we want to test. For this case, special characters could be one of those, or entering the user name that is very long, etc.
Now we can link the test case in MTM with the unit test we wrote in my previous part 1 post and leverage the data points entered in MTM. The great thing about this, is that we keep the single point of specification of the test case and the values we want to try when we do a run and we get the benefits of automation.
Driving the automated test with data from the test case in MTM
In order to make this work, we need to add a [DataSource] Atttribute to the test method in the unit test. this attribute enables us to use the data items we specified in the test case to serve as a data source. (In this example we can refer to test case 77, as you can see in the picture above) Once we have done that, we can use the TestContext property inside our test method to get the data from the MTM test. In the TestContext you can reference the variable names that we defined in the test case in MTM. these can be found un the DataRow in the test context where the name of the variable is the same as the variable names in MTM only without the @ sign. So rewriting the test to leverage the test data from my test case looks as follows:
[TestMethod]
[DataSource("Microsoft.VisualStudio.TestTools.DataSource.TestCase",
      "https://win-gs9gmujits8/tfs/DefaultCollection;Demos",
      "77",
       DataAccessMethod.Sequential)]
public void RegisterAndLoginOnDefaultASPMVCSite()
{
   var userName = this.TestContext.DataRow["UserName"].ToString();
   var passWord = this.TestContext.DataRow["PassWord"].ToString();

    driver.Navigate().GoToUrl(baseURL + "/");
    driver.FindElement(By.Id("registerLink")).Click();
    driver.FindElement(By.Id("UserName")).Clear();
    driver.FindElement(By.Id("UserName")).SendKeys(userName);
    driver.FindElement(By.Id("Password")).Clear();
    driver.FindElement(By.Id("Password")).SendKeys(passWord);
    driver.FindElement(By.Id("ConfirmPassword")).Clear();
    driver.FindElement(By.Id("ConfirmPassword")).SendKeys(passWord);
    driver.FindElement(By.CssSelector("input[type="submit"]")).Click();
    driver.FindElement(By.LinkText("Log off")).Click();
    driver.FindElement(By.Id("loginLink")).Click();
    driver.FindElement(By.Id("UserName")).Clear();
    driver.FindElement(By.Id("UserName")).SendKeys(userName);
    driver.FindElement(By.Id("Password")).Clear();
    driver.FindElement(By.Id("Password")).SendKeys(passWord);
    driver.FindElement(By.CssSelector("input[type="submit"]")).Click();
}
The final thing we need to change to make the [DataSource] attribute work is replace the [TestClass] Attribute on the class, with the [CodedUITest] Attribute. If you don’t replace the attribute you will run into an error when you execute the test: “The unit test adapter failed to connect to the data source or to read the data.”
Note, this is only required when you run in visual Studio 2012, in visual studio 2010 the attribute also works on classes only marked as TestClass
Now when we automate tests, we still want to leverage the ability to capture the diagnostics data from the Diagnostic data adapters that we normaly have when we run a test in MTM. This is possible by using MTM to run the automated tests. The way you do this is by associating a test automation to your test case en marking the test case as automated. Marking a test as automated is merely an indication that a tester can run the test automated, but he still keeps the ability to test the case manually.
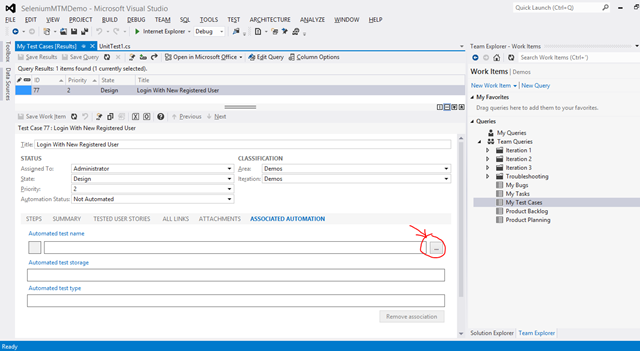
Associate the test case with the Test Automation
Associating the test case in MTM with a unit test is done in visual studio. You need to take the following steps:
Open the test case in visual Studio
On the Tab, Test Automation you can click the button with … on it
Now you will see a dialog, where you can pick the unit test you would like to Associate
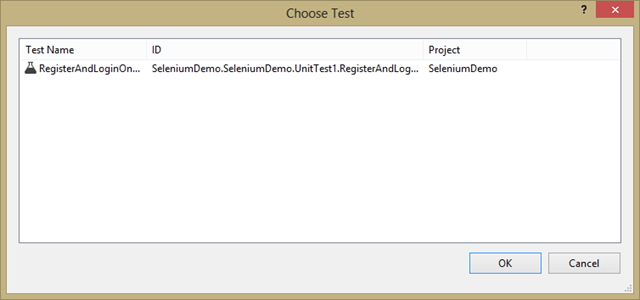
Now you select the Test and this will update the work item, so it can find your unit test when it is run from MTM.
Run the automated test from MTM
With the previous steps done, we can run our test case automated from within MTM. The only problem we will run into is that if we run our test, it needs the Selenium drivers placed on the hard drive of the test machine. remember that we have used a hardcoded path in our Setup() method. This is a problem, especially when I want to be able to run the test from just any machine that I have a test agent running on. To fix this problem, I want my test automation to be free of these kinds of pre-setup requirements and this can be done by leveraging the MS Test capability of deploying those prerequisites with the test itself.
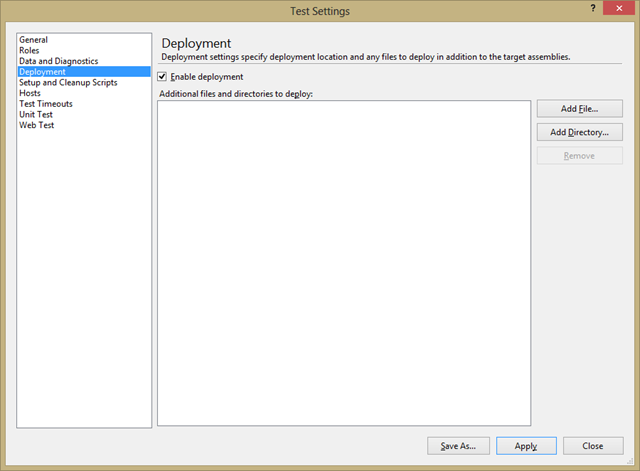
For this to work, I need to add the [DeploymentItem] Attribute to my test class and enable deployment in the *.testsettings file that has my settings for diagnostics.
TestSettings files where added default when you created a test project in visual Studio 2010, but in Visual Studio 2012 they build the new agile runner infrastructure that does not uses these files. If you do need them, as in this particular case, you can still add a test setting file to your project, by right clicking on your solution and select add new item (clicking on your project or anywhere else and doing the same will never get you to this file type, so be aware to click right …)
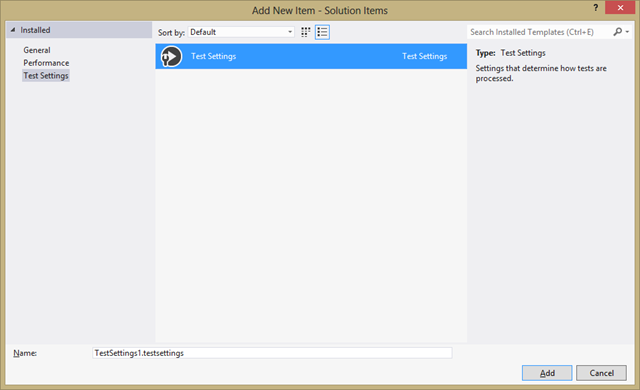
Now once you added your file to the solution, you can double click it and select the Enable Deployment option, as show in the picture below.
Now [DeploymentItem] deploys any item I specify to the Test Run folder and I can access that location information from the TestContext property. Now the only thing I need to arrange is that my build produces output that I can access with the [DeploymentItem] attribute.
For this I just add a folder to my project and then add the two driver executables in that folder. Include them to the project and mark the properties on those files as Copy if newer, so they will be copied to the output folder where the binaries of my tests are.
My project structure after this step looks as follows: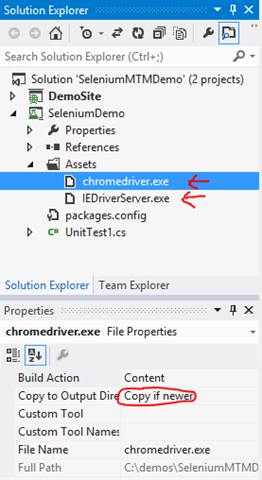
And my unit test is now modified with the following attributes:
[DeploymentItem(@”Assetschromedriver.exe”)]
[DeploymentItem(@”AssetsIEDriverServer.exe”)]
After we have modified the test class with all these steps I described, the unit test class looks as follows:
using System;
using Microsoft.VisualStudio.TestTools.UnitTesting;

namespace SeleniumDemo
{
    using System;
    using System.Text;
    using System.Collections.Generic;
    using System.Linq;
    using Microsoft.VisualStudio.TestTools.UnitTesting;
    using OpenQA.Selenium;
    using OpenQA.Selenium.Chrome;
    using Microsoft.VisualStudio.TestTools.UITesting;

    namespace SeleniumDemo
    {
        [CodedUITest]
        [DeploymentItem(@"Assetschromedriver.exe")]
        [DeploymentItem(@"AssetsIEDriverServer.exe")]
        public class UnitTest1
        {
            public TestContext TestContext
            {
                get { return testContextInstance; }
                set { testContextInstance = value; }
            }
            private TestContext testContextInstance;
            IWebDriver driver;
            private string baseURL;

            [TestInitialize]
            public void Setup()
            {
                driver = new ChromeDriver(TestContext.DeploymentDirectory);

             }

            [TestCleanup]
            public void TearDown()
            {
                driver.Quit();
            }

            [DataSource("Microsoft.VisualStudio.TestTools.DataSource.TestCase", "http://win-gs9gmujits8:8080/tfs/defaultcollection;Demos", "77", DataAccessMethod.Sequential), TestMethod]
            public void RegisterAndLoginOnDefaultASPMVCSite()
            {
                var userName = this.TestContext.DataRow["UserName"].ToString();
                var passWord = this.TestContext.DataRow["PassWord"].ToString();
                //use the local host adress for your project here->
                baseURL = this.TestContext.DataRow["URL"].ToString();

                driver.Navigate().GoToUrl(baseURL);
                driver.FindElement(By.Id("registerLink")).Click();
                driver.FindElement(By.Id("UserName")).Clear();
                driver.FindElement(By.Id("UserName")).SendKeys(userName);
                driver.FindElement(By.Id("Password")).Clear();
                driver.FindElement(By.Id("Password")).SendKeys(passWord);
                driver.FindElement(By.Id("ConfirmPassword")).Clear();
                driver.FindElement(By.Id("ConfirmPassword")).SendKeys(passWord);
                driver.FindElement(By.CssSelector("input[type="submit"]")).Click();
                driver.FindElement(By.LinkText("Log off")).Click();
                driver.FindElement(By.Id("loginLink")).Click();
                driver.FindElement(By.Id("UserName")).Clear();
                driver.FindElement(By.Id("UserName")).SendKeys(userName);
                driver.FindElement(By.Id("Password")).Clear();
                driver.FindElement(By.Id("Password")).SendKeys(passWord);
                driver.FindElement(By.CssSelector("input[type="submit"]")).Click();
            }
        }
    }

}
Now when I go to MTM and want to run the test automated, you can now (because we associated the test case with the test automation) run the test automated and have the diagnostic data adapters collect information during your run, based on the setting you specify in the test plan. There you specify if you want to have Action recordings, video recording, Intellitrace, etc.
To run the test automated, select the test case, click run with options, there select the environment where the Test Agent is running that should run your test and wait until the test is reported back to MTM
Test run results
When you have a success run you will see the following:(I took this shot from our current project, so not the demo I created for this post, hence I removed some data from the picture to protect the innocent :-))
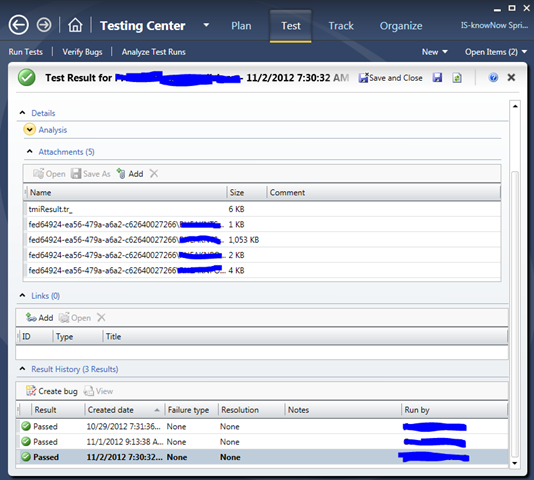
Now note that there are no intellitrace log files and video, since the run was passed. Only when the run fails you will see the collected data, so you can repro the scenario much esyer then without using MTM.
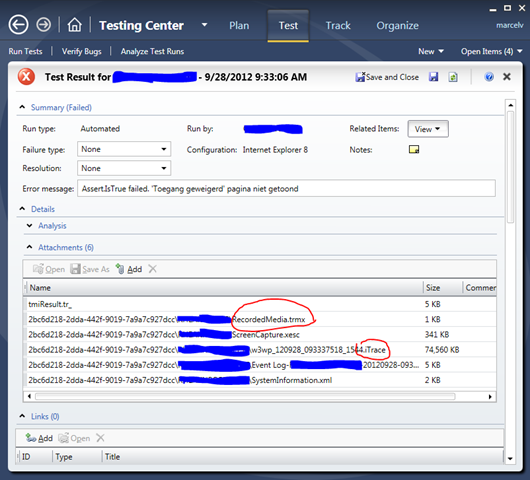
A failed run might look as follows (Also taken from my project, but one of the runs from the passed that failed)
In the next post I will show you how you can set up your tests in such a way, that they are more resilient to changes in the actual pages.
Follow my new blog on http://fluentbytes.com